Nintendo DS Upper LCD Screen Replacement
ID: 1305
Description: The purpose of this guide is to explain how to...
Steps:
- Remove the cartridge from the console.
- Use a Phillips #00 Screwdriver to remove the screw securing the battery door to the rear case.
- Remove the battery door.
- In the images, it shows that the fixer is using a flathead screwdriver. This flathead screwdriver will work just like the Phillips #00 Screwdriver.
- Use a plastic opening tool or spudger to pry out the battery from the bottom. If a plastic opening tool or spudger isn't available, your fingernails may work.
- Remove the battery from the Nintendo DS.
- Remove the seven 6.4mm Y00 screws located on the back.
- If your DS has a lanyard attached to it, you can remove it to make the process of opening the top-left screw easier.
- With your hands, pry the back panel off the main case.
- Separate the back from the front, and set it aside.
- Using a Phillips #00 screwdriver, remove the four screws on the circuit board.
- Be careful NOT to slip with the screwdriver, you can damage the circuit board!
- Unlock the two large ribbon cables by moving the black clip up.
- Carefully pull the ribbon cables down and out with your fingers.
- Do not use pliers to pull the cables, as they can be damaged easily.
- Locate the two small ribbon cables, beneath the rightmost large ribbon cable.
- Slide the locks for the small ribbon cables down to the side, and remove the cables.
- It may be useful to use tweezers to remove the small ribbon cables.
- Be careful not to damage the delicate ribbon cables.
- Locate the Wifi antenna pigtail connector.
- Remove the antenna by grasping it at the head with tweezers. Using a slight rocking motion, pull up to dislodge the connector.
- Feed the ribbon cables through the opening on the board.
- Pull up and remove the circuit board, and set it aside.
- Use a flathead screwdriver, tweezers, a toothpick or dental tool to remove rubber covers on screen.
- While doing so, please be sure to remove the rubber screw covers carefully. If they rip or get damaged, you may have to buy new ones. These are NOT required to seal up the console, but for aesthetic purposes and for keeping dirt and water out, you should (re)install the rubber screw covers.
- Remove the four screws using a Phillips #00 screwdriver.
- Using a plastic opening tool, pry the edges of the plastic case apart at the seam.
- Separate the top cover from the body.
- Using a Phillips #00 screwdriver, remove the screw holding the hinge cover in place.
- Remove the hinge cover and set it aside.
- Feed the ribbon cables and the Wifi pigtail cable through the opening in the hinge cover.
- Remove the yellow spacer, and set aside.
- Using a Phillips #00 screwdriver, remove the two screws holding down the speaker circuit boards.
- Remove the two small circuit boards and set aside.
- Be careful of the small red and black wires connecting the two circuit boards not to break them.
- Move the black lock on the two large ribbon cables up with a pry tool, and gently pull out the two ribbon cables.
- For the small ribbon cable, pull the lock downwards.
- Gently pull out the small ribbon cable from the connector.
- Set the two small circuit boards aside
- Be careful not to damage the two delicate ribbon cables when removing them from the DS.
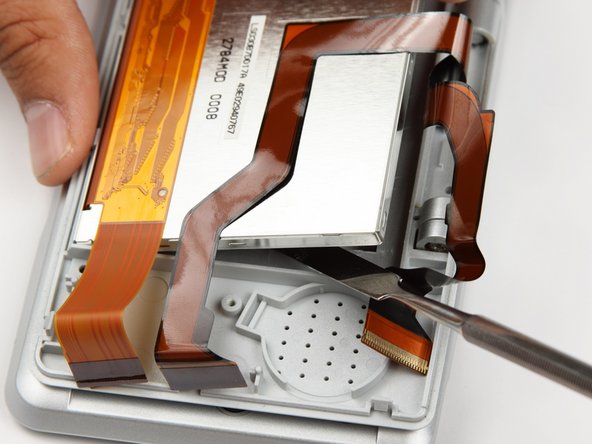
- Using a pry tool, gently lift the top screen out of the shell.
- Set the top screen aside


